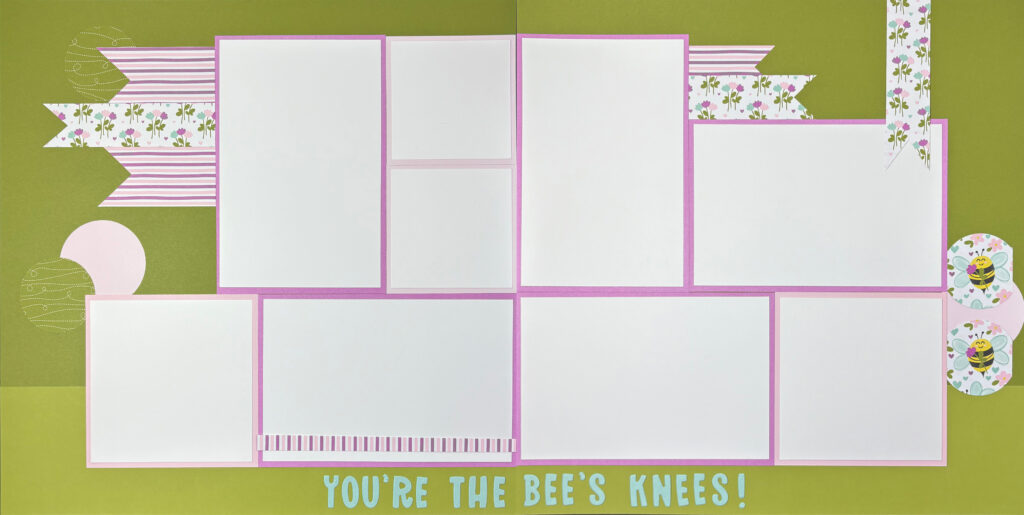
Measurements:
|
Product |
Size |
Quantity |
Details |
|
166683 |
12” x 12” |
2 |
Old Olive, dark side: Both sides |
|
166683 |
3” x 12” |
2 |
Old Olive, light side: Both sides |
|
166690 |
4” x 6” |
5 |
Petunia Pop: Both sides |
|
166676 |
4” x 4” |
2 |
Bubble Bath: Both sides |
|
166676 |
3” x 3” |
2 |
Bubble Bath: Both sides |
|
166676 |
2” x 2” |
2 |
Bubble Bath: Both sides [circles] |
|
166618 |
1 ½” x 3 |
2 |
Cute as Can Bee, Stripes: Left side [banner cut] |
|
166618 |
1” x 2” |
1 |
Cute as Can Bee, Stripes: Right side [banner cut] |
|
166618 |
¼” x 6” |
1 |
Cute as Can Bee, Stripes: Left side |
|
166618 |
1” x 4” |
2 |
Cute as Can Bee, Flowers: Both sides [banner cut] |
|
166618 |
1” x 3” |
1 |
Cute as Can Bee, Flowers: Right side [banner cut] |
|
166618 |
2” x 2” |
2 |
Cute as Can Bee, Green: Left side [circles] |
|
166618 |
2” x 2” |
2 |
Cute as Can Bee, Bumble with Flowers: Right side [circle] |
|
122924 |
6” x 11” |
1 |
Pool Party: Both sides [die cut letters] |
|
159276 |
3 ¾” x 5 ¾” |
5 |
Basic White: Both sides |
|
159276 |
3 ¾” x 3 ¾” |
2 |
Basic White: Both sides |
|
259276 |
2 ¾” x 2 ¾” |
2 |
Basic White: Left side |
Instructions:
1. Follow the measurements guide and cut all cardstock and DSP as noted.

Left Side:
1. Take one (1) 12” x 12” Old Olive, Two-Tone. This will be your base.
2. Take two (2) 4” x 6” Petunia Pop and two (2) 3 ¾” x 5 ¾” Basic White. Adhere the Basic White to the center of the Petunia Pop with your Stampin’ Seal. Set aside.
3. Take two (2) 3” x 3” Petunia Pop and two (2) 2 ¾” x 2 ¾” Basic White. Adhere the Basic White to the center of the Petunia Pop with your Stampin’ Seal. Set aside.
4. Take one (1) 4” x 4” Petunia Pop and one (1) 3 ¾” x 3 ¾” Basic White. Adhere the Basic White to the center of the Petunia Pop with your Stampin’ Seal. Set aside.
5. Take two (2) 1 ½” x 3” Cute as Can Bee, Stripes, and banner cut one end. Set aside.
6. Take one (1) 1” x 4” Cute as Bee, Flowers, and banner cut one end. Set aside.
7. Take two (2) 2” x 2” Cute as Can Bee, Green, and cut a 1 ¾” circle out of each. Set aside.
8. Take one (1) 2” x 2” Bubble Bath, and cut a 2” circle out of it. Set aside.
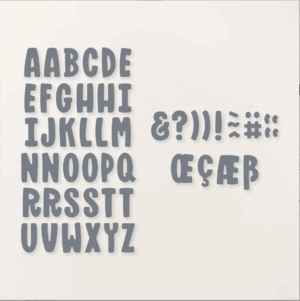
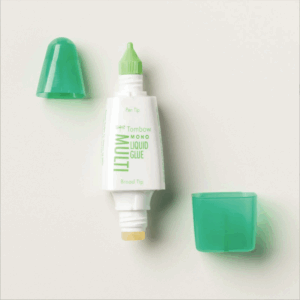
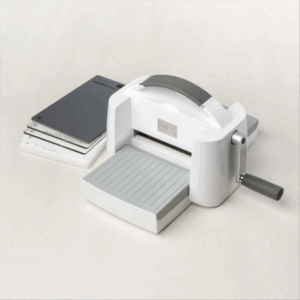
9. Take one (1) 6” x 11” Pool Party and your Mini Alphabet Dies. Using your Stampin’ Cut and Emboss Machine, cut out letters for your title. For this page we went with ‘You’re the Bee’s Knees!’. For ease of use, add an adhesive sheet to the back of your Pool Party prior to cutting. If you don’t have adhesive sheets, don’t worry! You can adhere the letters with your Multipurpose Liquid Glue.
10. Take one (1) 3” x 12” Old Olive, Two-Tone. Adhere flush horizontally to the bottom of your base with your Stampin’ Seal. Be sure to use opposite sides so the colors show for the base and strip.
11. Take one (1) 4” x 6” stacked Petunia Pop and adhere horizontally approximately 1 ½” from the bottom of the page, flush to the right side, with your Stampin’ Seal.
12. Take one (1) 4” x 4” stacked Petunia Pop and adhere flush to the left side of the 4” x 6” Petunia Pop with your Stampin’ Seal.
13. Take one (1) 1 ¾” Green Circle and one (1) 2” Bubble Bath circle and adhere slightly behind the 4” x 4” Bubble Bath square as shown in the image with your Stampin’ Seal.
14. Take two (2) 3” x 3” stacked Bubble Bath squares and adhere flush to the right side of the page and flush to the 4” x 6” Petunia Pop with your Stampin’ Seal as shown in the image.
15. Take one (1) 4” x 6” stacked Petunia Pop and adhere flush to the left side of the 3” x 3” Bubble Bath squares with your Stampin’ Seal as shown.
16. Take two (2) banner cut 1 ½” x 3” Cute as Can Bee, Stripes and one (1) banner cut 1” x 4” Cute as Can Bee, Flowers. Adhere with your Stampin’ Seal flush to the left side of the 4” x 6” Petunia Pop, with the Cute as Can Bee, Flowers slightly overlapping the two (2) Cute as Can Bee, Stripes. Slide one (1) 1 ¾” Green circle behind the top banner as shown in the picture.
17. Take half of your title [for our layout, ‘You’re The’] and adhere at the bottom of the page as shown, either by removing the adhesive sheet or using your multipurpose glue.

Right Side:
1. Take one (1) 12” x 12” Old Olive, Two-Tone. This will be your base.
2. Take three (3) 4” x 6” Petunia Pop and three (3) 3 ¾” x 5 ¾” Basic White. Adhere the Basic White to the center of the Petunia Pop with your Stampin’ Seal. Set aside.
3. Take one (1) 4” x 4” Petunia Pop and one (1) 3 ¾” x 3 ¾” Basic White. Adhere the Basic White to the center of the Petunia Pop with your Stampin’ Seal. Set aside.
4. Take one (1) 1” x 2” Cute as Can Bee, Stripes, and banner cut one end. Set aside.
5. Take one (1) 1” x 3” Cute as Can Bee, Flowers, and one (1) 1” x 4” Cute as Can Bee, Flowers, and banner cut one end. Set aside.
6. Take one (1) 2” x 2” Bubble Bath, and cut a 2” circle out of it. Set aside
7. Take two (2) 2” x 2” Cute as Can Bee, Bumble with Flowers, and cut a 1 ¾” circle out of each, keeping the bumble bee in the center. Set aside.
8. Take one (1) 3” x 12” Old Olive, Two-Tone. Adhere flush horizontally to the bottom of your base with your Stampin’ Seal. Be sure to use opposite sides so the colors show for the base and strip.
9. Take one (1) 4” x 6” stacked Petunia Pop and adhere horizontally approximately 1 ½” from the bottom of the page, flush to the left side, with your Stampin’ Seal.
10. Take one (1) 4” x 4” stacked Petunia Pop and adhere flush to the right side of the 4” x 6” Petunia Pop with your Stampin’ Seal.
11. Take one (1) 4” x 6” stacked Petunia Pop and adhere vertically flush to the 4” x 6” horizonal Petunia Pop and flush to the left side of the base, with your Stampin’ Seal.
12. Take one (1) 4” x 6” stacked Petunia Pop and adhere horizontally flush to the right side of your last 4” x 6” stack and flush to the top of the 4” x 6” stack and 4” x 4” stack with your Stampin’ Seal, as shown in the picture.
13. Take one (1) banner cut 1” x 2” Cute as Can Bee, Stripes, and adhere to the right of the top stack, as shown in the image, with your Stampin’ Seal.
14. Take one (1) banner cut 1” x 3” Cute as Can Bee, Flowers, and adhere slightly overlapping the Stripes banner cut with your Stampin’ Seal.
15. Take one (1) banner cut 1” x 4” Cute as Can Bee, Flowers, and adhere vertically with your Stampin’ Seal from the top of the page, slightly overlapping the stacked Petunia Pop, as shown in the image.
16. Take one (1) Bubble Bath 2” circle and adhere to the right of the 4” x 4” stack with your Stampin’ Seal, as shown in the image.
17. Take two (2) Cute as Can Bee, Bumble with Flowers, 1 ¾” circles, and adhere with your Stampin’ Seal, slightly overlapping the Bubble Bath circle as shown in the image.
18. Take the remaining half of your title [for our layout, ‘Bee’s Knees!’] and adhere at the bottom of the page as shown, either by removing the adhesive sheet or using your multipurpose glue.
Tip: This page set can be used for multiple occasions; just select the word you wish [or use a sentiment!]
NOTES:
1. At the time of creation of this page set, all supplies were available on the Stampin’ Up website. However, items can be sold out or discontinued at any time. Feel free to use other supplies to make similar pages based on what you have available.
2. If you would like to order any of the supplies, you will need to create an account online with your personal information – Demonstrators cannot keep personal information on customers. We have provided links to the supplies for ease of use [linked by item number] and can provide hard copy catalogs if desired as well. If you need additional assistance, please reach out to info@mycraftingworkshop.com – we are more than happy to assist!
Supplies:
-
Adhesive Sheets
-
BASIC WHITE 8.5 X 11 CARDSTOCK
-
Bubble Bath 12? x 12? Two-Tone Cardstock
-
Mini Alphabet Dies
-
Multipurpose Liquid Glue
-
Old Olive 12? x 12? Two-Tone Cardstock
-
Petunia Pop 12? x 12? Two-Tone Cardstock
-

Petunia Pop 12? x 12? Two-Tone Cardstock
-

Pool Party 8.5 x 11 Cardstock
-
Stampin’ Cut and Emboss Machine